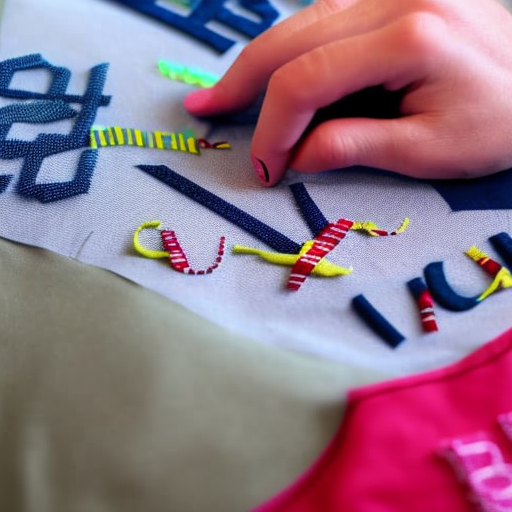
Sewing Fabric Letters onto a Shirt
fabric-letters.jpg” alt=”Sewing fabric letters onto a shirt” />
Adding fabric letters to a shirt is a creative way to personalize your clothing and make a statement. Whether you want to showcase your name, a favorite word, or a unique design, sewing fabric letters onto a shirt allows you to express your individuality. Here is a step-by-step guide on how to sew fabric letters onto a shirt.
Materials You Will Need:
- A shirt of your choice
- Fabric letters or fabric of your choice to cut out the letters
- Thread matching the fabric letters
- A sewing needle
- A pair of scissors
- Pins or clips to hold the fabric in place
- An iron and ironing board
Step-by-Step Instructions:
- Start by choosing the fabric letters or preparing the fabric to cut out the desired letters. If you’re using pre-made fabric letters, skip to step 3.
- To create your own fabric letters, draw the letters on the fabric using a stencil or freehand. Ensure that the letters are sized appropriately to fit on the shirt.
- Carefully cut out the fabric letters using sharp scissors. Take your time to ensure clean edges.
- Place the shirt on a flat surface and determine the placement of the fabric letters. You can try different arrangements to see what looks best.
- Secure the fabric letters onto the shirt using pins or clips. Make sure they are aligned and positioned correctly.
- Tread the needle with a thread matching the fabric letters, and tie a knot at the end of the thread.
- Starting from the inside of the shirt, push the needle through the fabric letter and the shirt’s fabric, coming up from the back.
- Bring the needle back down through the fabric letter and the shirt, creating a small stitch. Repeat this process along the edges of the fabric letter, spacing the stitches evenly.
- Continue sewing around the entire perimeter of the fabric letter until it’s securely attached to the shirt. Make sure to knot the thread at the end to prevent unraveling.
- Repeat the above steps for each fabric letter you want to sew on.
- Once all the fabric letters are sewn on, iron the shirt on low heat to remove any wrinkles caused by the sewing process and to set the stitches.
With these simple steps, you can easily sew fabric letters onto a shirt and create a unique and personalized garment. Remember to take your time and enjoy the process, and don’t be afraid to experiment with different fabric colors and lettering styles to make your shirt truly one-of-a-kind!
Happy sewing!
Looks great!
Gina Mari: Such a creative idea!
What an awesome way to personalize a shirt! It’s a great way to make a statement or give a special gift to someone you love. I bet there’s a lot more ideas you can do with fabric letters!